
This article will show you how to use the Position Scheduler so that you can make sure you are filling your weekly shift requirements with the right employees. If you would like to watch a video tutorial to learn more, please see our tutorial on the Position Manager & Position Scheduler.
To access the Position Scheduler, begin by clicking Schedules from the top navigation bar.
![]()
Select the name of a department to get to the schedule.

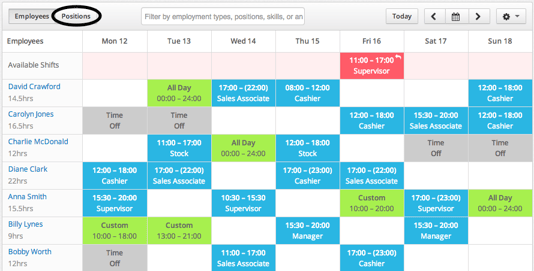
At the top left corner of the schedule you will notice that the Employees tab is highlighted. Click on the Positions tab to access the Position Scheduler.
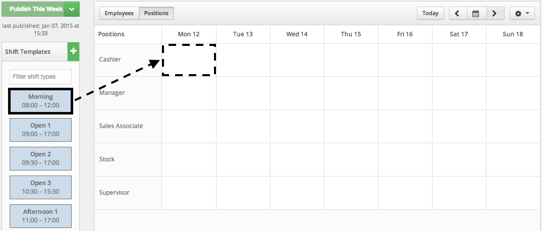
If you haven't scheduled any shifts for your employees yet, you will see a blank Position Schedule like the one below. This view of the schedule allows you to assign shifts by position instead of by employee. The left column of the schedule lists all of the positions that exist within this department.

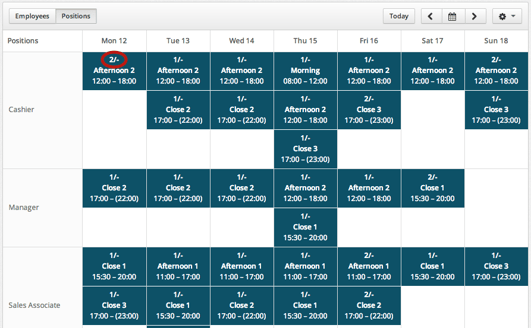
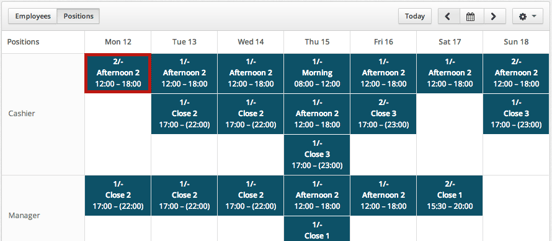
If you have already scheduled shifts for your employees, your Position Schedule will look something like the picture below with navy blue squares filling the page. These navy blue squares show shifts that you have already scheduled for employees but have not yet set as one of your requirements.
For example, if you look in the first box under Monday the 12th, there is a number that says "2/-". This shows you that you have two employees scheduled to work this afternoon shift but because you have not set this as a required shift on this day, you are overstaffed.
There are two ways to create new shift requirements. One way is to drag a shift from the left column of Shift Templates and drop it onto the spot on the schedule that corresponds with the correct position and day of the week.
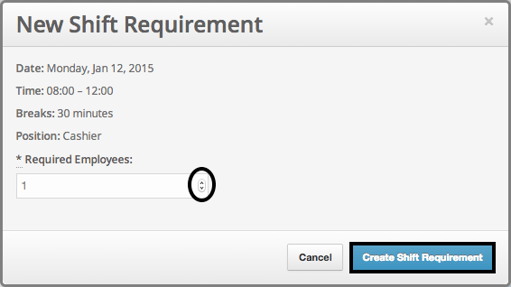
You will now see the New Shift Requirement box. You can adjust the number of required employees for this shift by typing a number in the box or adding more or less by clicking on the arrows. Then click the Create Shift Requirement button.
Once you have created the new shift requirement, you will see three different tabs along the top of the Shift Requirement box:
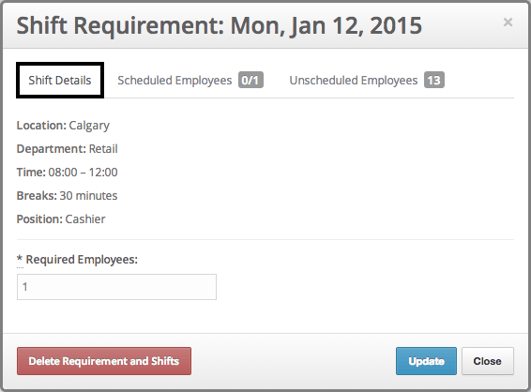
- Shift Details - Shows all of the details of the shift requirement such as position, location and department. You can edit the number of required employees from this screen and then click the Update button or delete this requirement altogether by clicking the Delete Requirement and Shifts. Keep in mind that if you have scheduled any employees for this shift and you delete the requirement, all of these shifts will be removed from the employees' schedules as well.
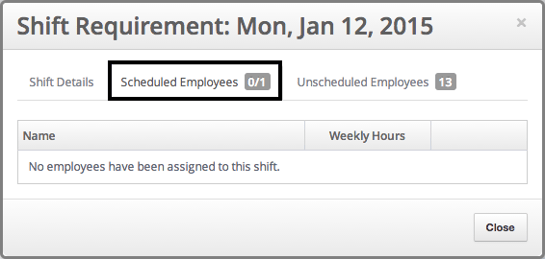
- Scheduled Employees - The number at the top shows how many employees you have already scheduled out of the total that you require. From this tab you can see which employees have already been assigned this shift.
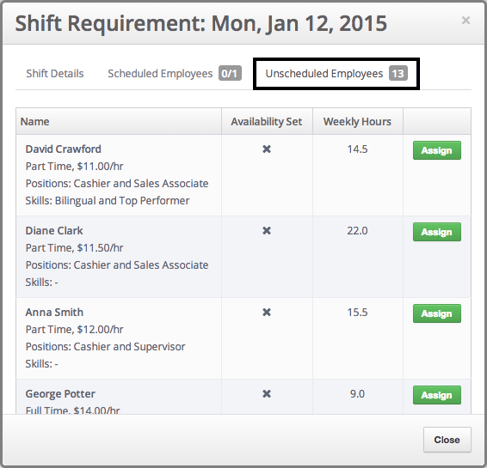
- Unscheduled Employees - This tab lists all of your employees that have the required position and are available to work during the hours of this shift. You can assign employees to this shift directly from this screen by clicking the Assign button to the right of the employee's name. This screen allows you to assign shifts to employees based on things like wage, positions and weekly hours worked so you know that you are getting the best person for the job.
You can close the Shift Requirement box at any time by clicking the Close button at the bottom right corner of each screen.
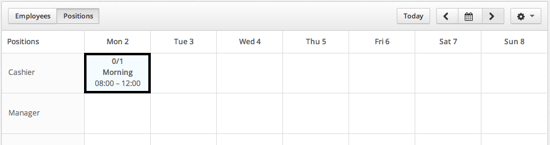
You will now see your new shift requirement on the Position Schedule. You can click on this box whenever you would like to view any of the above details or assign employees to work this shift.
The second way to create a new shift requirement is useful when you have already scheduled shifts for your employees and they appear as navy blue squares on the schedule (as we saw above). Simply click on one of these navy blue boxes and repeat the above steps to create the requirement with the correct number of employees.
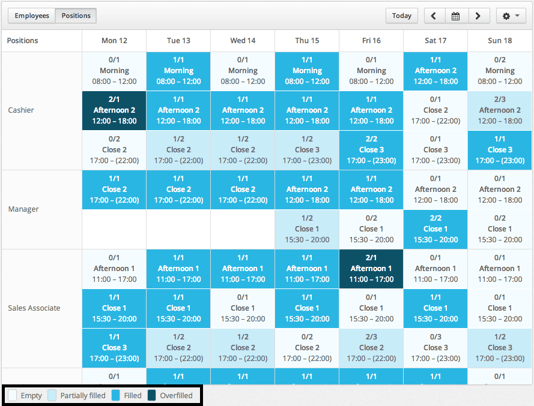
Once you have completed setting your weekly requirements, you will able to schedule by switching between your Employee and Position Schedule to make sure that you have enough employees scheduled when you need them. Your requirements will begin to fill up as you schedule which you will be able to visualize as the colors on the schedule change. The legend at the bottom left of the schedule outlines what each color represents.
*Tip: To save time making the Position Scheduler, copy and paste it from week to week and make any changes you might need to afterwards. To learn how to copy and paste a weekly schedule, please read our article on How to Copy and Paste Weekly Schedules.